
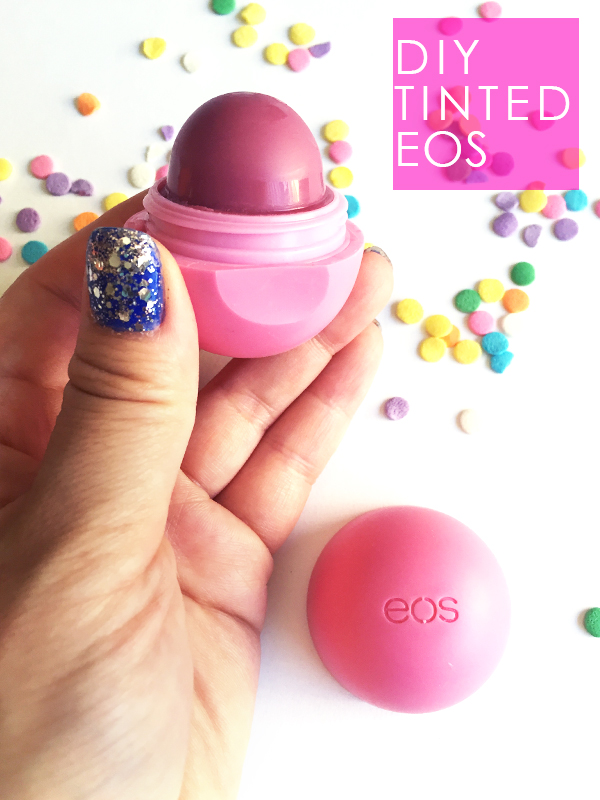
I love using EOS lip balms because of their cute rounded shape – they go on well and you can easily find them in your purse. When that little dome of lip balm wears down, try this DIY to get a “new” full ball of tinted lip balm. I made this for myself because mine had lost it’s fun ball shape AND I had broken one of my fave lip sticks. So I figured why not just do a little upcycling using both. I thought I’d share this DIY since I was getting questions from coworkers whenever I twisted off the lid and people saw that I had a tinted EOS. They’d ask … “What flavor is that?” or…”Where’d you get one in a color?” … So here’s how you make it!
What you’ll need:
- 1 new or used EOS lip balm container
- At least half of your EOS lip balm left OR a full size regular lip balm (you need some type of lip balm, or beeswax, to hold the round shape)
- A tiny bit of Vaseline petroleum jelly OR coconut oil
- Some lipstick or solid lip gloss (preferably one that’s already broken)
- A sharp tool like a pocket knife
- Small pot
- Ladle
- Metal spoon
First you’re going to unscrew the top lid of your EOS container. The entire container is made up of 3 pieces. The bottom piece that contains the lip balm is actually made of up two pieces. Take your pocket knife (or other sharp tool) and carefully separate those two pieces.

The best way to do this is to look for this little nub on the rim and use that area to work your tool in between the rim and the bottom piece. You should be able to pop it right off.

When you pop the top piece off, all of the lip balm will go with it. Scrape out all of the lip balm using a spoon.

Place the lip balm, lipstick and vaseline/ coconut oil into the ladle. This part can get a little messy, but the end result is totally worth it.

Once you have that set up, take your lip balm container and screw the MIDDLE piece into the TOP piece. Make sure you do this before the next step
Now that you have your container set up, we’re ready to create the tinted lip balm. Fill your pot with about 1 to 2 inches of water and put it on low heat. Make sure that there’s not so much water in the pot that it goes into the ladle. Once the water starts boiling (it’ll be fast since there’s so little water), place your ladle into the pot and let all of the contents melt down. Stir continuously with a metal spoon.

This next step needs to happen fast. Once all your lip balm is melted down to a smooth, consistent liquid, pour it from your liquid into the lip balm container. There needs to be enough liquid filling the container to go through those 8 prongs on the middle piece.

Quick tip: use the BOTTOM piece to prop up your container while you let it cool. To help the lip balm cool faster, place it in the freezer for about 15 minutes.

When the lip balm has cooled enough so that it’s solid, screw in the BOTTOM piece.
 When you open it back up by unscrewing the TOP, you will get a perfect little dome of tinted lip balm.
 Isn’t that just perfect? I just love this little DIY. It’s so fun and addicting to make. I found myself going through my make up bag for lipsticks to create a bunch of different shades. Give it a try and let me know what you think!
December 9, 2017
Does the amount need to overflow the eight prongs
January 14, 2018
Hi Ava, yes it should overflow at least a little so the little ball of gloss can grip on. Hope it turns out well for you!
April 5, 2018
Was it supposed to color my lips? It didn’t really color the lips but it looks and smells good.
September 2, 2018
Hi Emma! It depends what lip color you mixed it with. The one I made here, I mixed with Fresh lip tint which is very subtle already so it only gave me a gentle hint of color. However I made another one with a little bit of leftover red lipstick and that gave me a lot more color.